Container Gardens
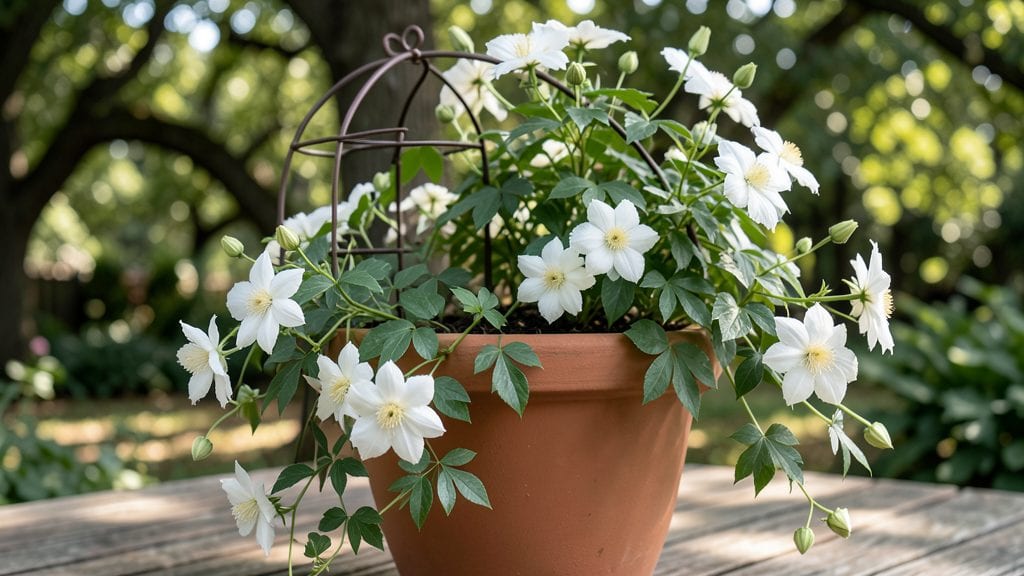
Growing clematis in containers lets you enjoy these showstopping vines without a yard—just the right pot, soil, and a little patience. ✨ I’ve turned my balcony into a vertical garden with clematis that climbs trellises and blooms reliably, even in small spaces.
The key is matching the vine’s love of depth with the right support and watering routine.
You’ll need a 15-20 gallon container (minimum) with drainage, well-draining soil mix, and a sturdy trellis or obelisk. Clematis roots need space to spread, so avoid shallow pots—this is where most beginners go wrong.
Water deeply when the top inch of soil feels dry, and fertilize lightly during the growing season to avoid overfeeding.
With the right setup, you’ll see lush, vigorous growth by late spring and months of blooms from summer into fall. The pruning is minimal—just a few cuts in early spring to shape the vine.
Even in containers, these plants thrive when treated like the climbers they are, not like delicate annuals.
Winter care is simple: move containers to a sheltered spot or wrap the roots in burlap if temperatures drop below 20°F. The same container setup works year-round with these adjustments, making it perfect for patios, decks, or small yards. Let’s get those vines climbing!
📚 In This Guide
- What you need
- Instructions
- Tips and common mistakes
- Wrapping up and next steps
What you need
- ● Containers: At least one 10–15 gallon pot per clematis vine. Opt for fabric grow bags (for better aeration) or terra cotta/ceramic pots (for insulation). Ensure pots have drainage holes (or drill them yourself!).
- ● Potting Mix: 10–15 gallons of well-draining, peat-free mix (e.g., 60% potting soil, 30% perlite, 10% compost). Clematis hates soggy roots!
- ● Clematis Vine: 1–3 bare-root or potted plants (choose smaller varieties like ‘Jackmanii’ or ‘Niobe’ for containers).
- ● Support Structure: Trellis or obelisk: 1 per container (height: 4–6 ft). Use metal or PVC for durability.
- ○ Stakes or rings: 2–3 per pot (optional, for extra stability).
- ● Mulch: 1–2 inches of organic mulch (e.g., shredded bark or straw) to retain moisture.
- ● Hand trowel (for planting)
- ● Pruning shears (sterilized!)
- ● Garden gloves (to protect your hands)
- ● pH testing kit (aim for 6.5–7.0 soil pH)
- ● Slow-release fertilizer (e.g., 10-10-10 or osmocote)
- ● Watering can with a rose attachment (for gentle watering)
- ● 🌡️ Location: Place containers in full sun (6+ hours/day)—clematis loves to soak up rays!
- ● ✨ Pairing: Plant low-growing companions (like heuchera or ferns) at the base to hide the vine’s woody stems.
- ● 🔥 Winter Prep: Move containers to a sheltered spot or wrap them in bubble wrap in freezing climates.
Step-by-Step instructions for thriving clematis in containers
Here's my foolproof method for growing vigorous, blooming clematis vines in containers—no pruning headaches included.
🪴 Step 1: Choose the Right Container and Support System
Select a container with a minimum 12-inch diameter and 18-inch depth—clematis roots need room to spread and anchor. I prefer unglazed terra cotta because it breathes and prevents root rot, but any pot with drainage holes works. Add a 3-inch layer of gravel at the bottom to improve drainage and prevent soggy roots.
Install a strong trellis or obelisk immediately—clematis vines grow 10-15 feet annually and need support from day one. Secure the trellis inside the pot so roots can intertwine with it naturally. A 5-foot tall metal obelisk works perfectly for container-grown vines, giving them vertical space without taking up garden real estate.
🌱 Step 2: Layer Soil for Ideal Root Conditions
Fill the container with 6 gallons of well-draining potting mix, but don't stop there—clematis thrives with a three-layer soil system. Start with 2 gallons of coarse perlite at the bottom for aeration, then add 3 gallons of premium potting mix mixed with 1 cup of compost. Top with 1 gallon of lightweight, airy mix (half potting soil, half coconut coir) to encourage root spread.
This layered approach mimics clematis' natural woodland habitat, where roots encounter both moisture and aeration. Press each layer gently to eliminate air pockets but avoid compacting the soil. Water thoroughly after planting to settle everything into place—you'll see the top layer sink slightly as roots establish.
☀️ Step 3: Plant and Position for Maximum Sunlight
Dig a hole twice as wide as the root ball but only as deep as the container's original soil line. Place your clematis plant so the crown sits just below soil level—burying it too deep suffocates the plant, while exposing it invites rot. Gently tease out any circling roots to encourage outward growth into your layered soil.
Position your container in full sun (at least 6 hours daily), but here's the trick: morning sun with afternoon shade prevents leaf scorch in hot climates. If you're in a Zone 7+, move containers to partial shade during peak summer afternoons. Watch for glossy, wilting leaves—this is your cue to adjust light exposure immediately.
💧 Step 4: Water Deeply and Establish a Consistent Routine
Water deeply every 2-3 days until the top 3 inches of soil feel dry to the touch. Clematis roots run deep, so shallow watering encourages weak, surface roots. I use a slow-release drip irrigation system for containers to maintain even moisture without soggy soil. Mulch with 2 cups of shredded bark to retain moisture and regulate soil temperature.
During the first 30 days, check soil moisture daily—container plants dry out faster than in-ground vines. You'll notice yellowing lower leaves if roots struggle with inconsistent watering. This is your plant's way of saying "I need better hydration." Adjust your schedule based on weather; containers dry out faster in windy conditions or high heat.
✂️ Step 5: Minimal Pruning for Maximum Blooms
Wait until late winter (just before new growth appears) to prune. For Group 1 clematis (early bloomers), remove only dead or crossing stems. For Group 2-3 (late bloomers), cut back last year's stems to 2-3 healthy buds from the base. I always prune on a dry, overcast day to reduce stress on the plant.
Here's where clematis rewards patience: No summer pruning needed unless you see overly leggy growth. Pinch back new shoots to encourage bushier growth, but avoid heavy pruning—this stimulates weak, flowerless growth. Watch for new leaf pairs emerging in spring; these mark the perfect pruning points for shaping your vine without sacrificing blooms.
Tips & tricks for thriving clematis in containers
Container gardening with clematis rewards patience and attention to detail—here's how to avoid the pitfalls that trip up even experienced gardeners.
Container Size Matters: That 12-inch diameter and 18-inch depth aren't just minimums—they're non-negotiable for clematis. I've seen gardeners cram vines into smaller pots, only to watch them struggle by summer. The roots need that space to anchor and spread into your layered soil system. If you're working with limited space, consider a slightly wider pot (14-inch diameter) rather than deeper—clematis roots prefer horizontal expansion over vertical growth. The 3-inch gravel layer at the bottom isn't just decorative; it creates crucial air pockets that prevent the dreaded root rot that plagues container plants.
Soil Layering Technique: The three-layer system in Step 2 isn't just theoretical—it's what gives container clematis their vigor. That bottom layer of 2 gallons of coarse perlite might seem excessive, but it's the secret to preventing compacted, waterlogged soil. I've found that adding a handful of orchid bark to the perlite layer creates even better aeration. When pressing each layer, aim for gentle firmness—you want elimination of air pockets without creating a brick-like base. The top layer's coconut coir blend is particularly important for retaining moisture near the surface while allowing lower layers to dry slightly between waterings.
Sunlight Strategy: The 6 hours of daily sun requirement is non-negotiable, but the morning sun/afternoon shade trick is where container clematis truly shine. I've had clients in Zone 8 swear their clematis died from afternoon sun—only to discover they were moving the containers too late. Watch for those glossy, wilting leaves as your early warning system. In particularly hot climates, consider a lightweight shade cloth (30-40% coverage) that you can drape over the container during peak afternoon heat. This mimics the natural dappled light clematis would receive under forest canopies.
Pruning Precision: The late winter timing for pruning can't be stressed enough—this is when clematis enters its dormant phase and can handle the stress. I've made the mistake of pruning in early spring, only to watch new growth emerge and then get nipped by unexpected frosts. When cutting back Group 2-3 stems to 2-3 healthy buds, make your cuts just above a bud that faces outward—this encourages bushier growth toward the trellis. The dry, overcast day recommendation isn't just about comfort; it reduces stress on the plant by preventing rapid moisture loss through the cut stems.
Pro Tips for Clematis Container Gardening
- Container gardening with clematis rewards patience and attention to detail—here's how to avoid the pitfalls that trip...
- Container Size Matters: That 12-inch diameter and 18-inch depth aren't just minimums—they're non-negotiable for clema...
- Soil Layering Technique: The three-layer system in Step 2 isn't just theoretical—it's what gives container clematis t...
Frequently asked questions
Got questions about growing clematis in containers? You’re not alone! Here are some of the most common concerns—and their answers—to help you cultivate thriving vines with ease.
What’s the best container size for clematis?
Clematis needs room to spread—aim for a container at least 12–15 inches deep and wide. Larger pots (18+ inches) are ideal for dwarf varieties, while standard clematis thrives in bigger containers (20+ gallons). Ensure it has drainage holes to prevent root rot. Pro tip: Use lightweight materials like fabric grow bags for easier mobility!
When is the best time to plant clematis in containers?
Plant clematis in early spring (after the last frost) or fall (4–6 weeks before frost). Avoid summer heat, which stresses young roots. If buying potted plants, transplant them as soon as possible—they’re often root-bound. Bonus: Container-grown clematis can bloom the first year if planted early!
Can I grow clematis in containers without a trellis?
While clematis loves vertical support, you can train it in containers without a trellis—but expect smaller, less structured vines. Use a spider cage, obelisk, or even a sturdy wire frame to encourage upward growth. If skipping support, prune aggressively to control sprawl. Warning: Unsupported vines may flop or struggle in windy spots!
Why is my container clematis wilting or turning yellow?
Yellowing leaves or wilting often signal overwatering, underwatering, or poor drainage. Check the soil—it should stay moist but not soggy. Root rot (from stagnant water) is common in containers; ensure your pot drains well. Fix it: Adjust watering, repot if needed, and fertilize lightly with a balanced bloom booster.
How do I encourage more flowers on my container clematis?
Most clematis bloom on old wood (first-year growth), so minimal pruning (just trimming dead stems) works best. Feed with phosphorus-rich fertilizer in early spring (like 10-30-10) and deadhead spent blooms. Sunlight is key: Place containers in full sun (6+ hours/day) for vibrant flowers!
Wrapping up and next steps
Clematis container gardening proves that stunning vines don’t need a sprawling yard—just the right setup! With minimal pruning, proper support, and a little TLC, you can enjoy lush, vibrant blooms in even the smallest spaces.
Whether you’re a seasoned gardener or just starting out, these tips make it easy to cultivate thriving clematis without the hassle.
Ready to transform your balcony or patio? Pick your favorite variety, grab a container, and get growing! Share your progress or ask questions in the comments—we’d love to see (and help with) your clematis journey! 🌿✨