Landscaping
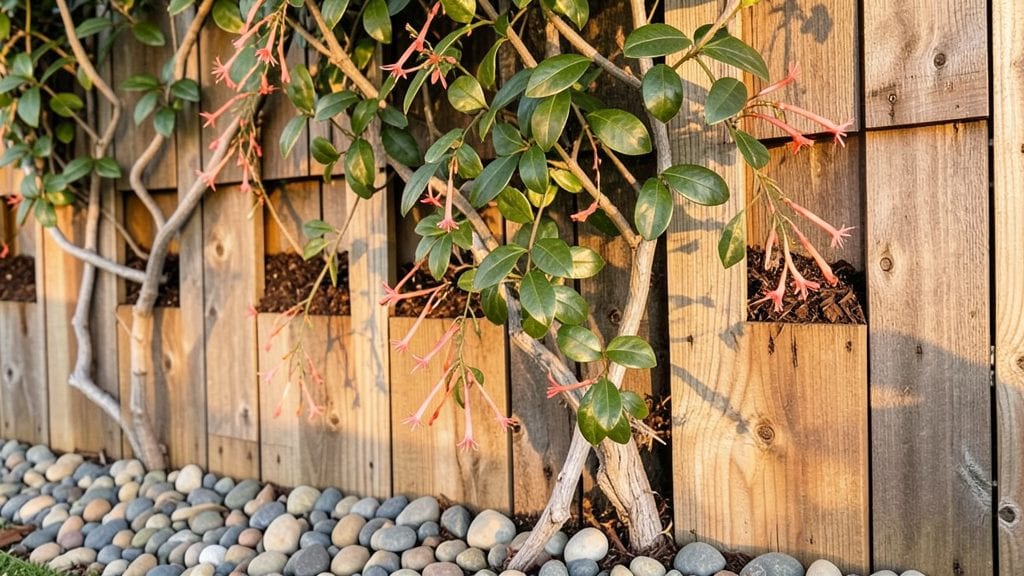
A vertical garden fence transforms bare walls into lush, living privacy screens that outperform wood or vinyl any day. 🌿 I installed mine last spring after my neighbor’s chain-link fence left me feeling exposed—and within weeks, the climbing roses and ivy turned my backyard into a green sanctuary.
The best part? No more mowing, staining, or replacing faded panels. This fence grows, blooms, and even improves air quality while keeping prying eyes out.
The setup is simpler than you’d think, especially with pre-made vertical garden panels or DIY trellis systems. You’ll need sturdy posts, a frame (wood, metal, or PVC), and plants that thrive vertically—think clematis, jasmine, or fast-growing vines like morning glories.
For small spaces, modular panels let you start with just a few sections and expand as your green thumb grows. The payoff? A year-round privacy screen that’s softer on the eyes and better for the planet.
By summer, your fence will be a riot of color and texture, with fragrant blooms and glossy leaves that block noise too. Maintenance is minimal: trim back leggy growth in spring, water deeply when it’s dry, and watch your living wall flourish.
It’s the kind of project that makes neighbors ask, “How’d you do that?”—and the answer is simple: patience, the right plants, and a little creativity.
Works for urban balconies, suburban backyards, or even rural properties where space is at a premium. Whether you go for a structured panel system or a rustic wooden trellis, the result is the same: a living, breathing fence that’s as functional as it is beautiful.
Ready to turn your fence line into a garden?
📚 In This Guide
- What you need
- Instructions
- Tips and common mistakes
- Wrapping up and next steps
What you need
- ● Fence Structure: Existing wooden, metal, or vinyl fence (or a new fence frame if building from scratch).
- ○ Optional: Trellis panels or lattice (for added structure, ~$20–$50 per panel).
- ● Growing Medium: Coir grow bags or fabric pockets (12–24 pockets, depending on fence length; ~$15–$30 each).
- ● Alternative: Pre-made modular planters (~$10–$25 each).
- ● High-quality potting soil (1–2 bags, ~$10–$20 each).
- ● Pro Tip: Mix in perlite or coconut coir for drainage! 🌡️
- ● Plants: Fast-growing vines (e.g., ivy, clematis, or morning glories; 3–6 plants per pocket).
- ● Succulents or herbs (e.g., rosemary, thyme; for low-maintenance options).
- ○ Optional: Flowering plants (e.g., petunias, fuchsias) for color bursts.
- ● Hardware & Fasteners: Stainless steel screws or nails (2–3 inches long, ~$10–$15 for a pack).
- ● Zippers or Velcro strips (to secure grow bags, ~$5–$10).
- ○ Optional: Waterproof adhesive strips for extra hold.
- ● Tools: Drill/driver with bits.
- ● Measuring tape and pencil.
- ● Scissors or utility knife (for cutting fabric pockets).
- ● Garden gloves and knee pads (for comfort!).
- ● Sunlight: Check your fence’s light exposure—most vines need 4–6 hours of sun daily.
- ● Water Access: A hose with a spray nozzle or drip irrigation system (~$20–$50).
- ● Climate: Choose plants suited to your hardiness zone (e.g., frost-resistant options for colder areas).
- ● Safety First: Wear safety goggles if drilling into metal fences.
Step-by-Step instructions for building a vertical garden fence
Here's how to create a lush, living privacy screen that thrives year-round with minimal maintenance.
🪴 Step 1: Assemble the Fence Structure
Start by attaching the vertical fence panels to your existing fence or wall using the provided hardware. I recommend using a level to ensure each panel sits perfectly straight—uneven panels will create gaps where plants can't grow evenly. Space the panels 12 inches apart to allow for future expansion and easy access for planting.
Secure each panel with 3-inch deck screws at the top and bottom, plus one in the center for extra stability. If your fence is tall, add a horizontal support beam every 4 feet to prevent sagging. This creates a sturdy frame that will hold your greenery without bending under weight.
🌱 Step 2: Install the Growing System
Slide the pre-drilled pockets or pockets into each vertical panel, ensuring they align evenly. These pockets will hold your soil and plants securely. I like to test-fit them first to confirm they slide smoothly—if they're too tight, gently sand the edges to avoid tearing the fabric.
Fill each pocket with the lightweight growing medium (never regular garden soil—it's too heavy). Press it down lightly so it stays in place but remains loose enough for roots to spread. Leave about 1 inch of space at the top of each pocket for watering and planting.
💧 Step 3: Plant Your Greenery
Choose plants that thrive in vertical spaces, like ivy, ferns, or trailing succulents. For best results, select plants with similar water and light needs—mixing sun-lovers with shade-tolerant varieties can create uneven growth. Gently loosen the roots of each plant before placing it into a pocket.
Fill the remaining space in each pocket with more growing medium, pressing lightly around the roots to secure the plant. Water immediately after planting to help the soil settle and eliminate air pockets. You'll see new growth within 2-4 weeks, signaling your fence is taking root.
☀️ Step 4: Water and Maintain Consistently
Water your vertical garden fence 2-3 times per week during the first month to help the plants establish strong roots. After that, adjust based on rainfall—your plants will tell you when they're thirsty by wilting slightly. I like to water in the early morning so the foliage dries quickly, reducing the risk of fungal issues.
Fertilize every 4-6 weeks with a balanced, water-soluble fertilizer to keep your plants lush and vibrant. Avoid over-fertilizing, as this can burn tender roots. Trim back any leggy growth in early spring to encourage bushier, fuller plants and maintain a neat appearance.
✂️ Step 5: Prune and Refresh Seasonally
In late winter or early spring, prune back any dead or overgrown branches to make room for new growth. This is also the perfect time to add new plants if any have died over the winter. I like to rotate plants occasionally—moving slower growers to the center and faster ones to the edges—to keep the fence looking balanced.
Check the pockets annually for signs of wear or soil depletion. If the fabric starts to tear or the soil loses its structure, replace the pockets and refresh the growing medium. With proper care, your vertical garden fence will provide year-round privacy and beauty for years to come.
Tips & tricks for perfect vertical garden fences
Transforming your outdoor space into a lush, green privacy screen doesn't have to be tricky—here are the secrets that make all the difference.
Precision Matters in Step 1: When attaching your panels in Step 1, take an extra minute to double-check that each panel is perfectly plumb using a level. Uneven panels create gaps where plants can't grow evenly, and those gaps will become obvious as your fence matures. I've learned the hard way that skipping this step leads to lopsided growth patterns—trust me, your fence will thank you.
Growing Medium Selection: The lightweight growing medium mentioned in Step 2 is non-negotiable. Regular garden soil is too dense and will weigh down your pockets, causing them to sag or even tear. Look for coco coir blends mixed with perlite—they provide excellent drainage while retaining enough moisture. If you're using pre-mixed bags, check that they're labeled for vertical gardening specifically.
Plant Placement Strategy: In Step 3, when selecting plants, place your fastest-growing varieties on the outer edges of each pocket. This creates a natural cascade effect that fills in gaps quickly. I like to position slower growers in the center—they'll establish roots while the edges create that full, lush look you're aiming for. This simple arrangement makes a noticeable difference in how quickly your fence fills out.
Watering Wisdom: The 2-3 times weekly watering in Step 4 is perfect for establishing roots, but here's what nobody tells you: use a gentle spray nozzle attachment on your hose to avoid disturbing the soil. Direct streams can create channels that bypass roots, while a fine mist ensures even moisture distribution. Watering in the early morning also helps prevent fungal growth—just make sure to water the soil, not the leaves, to minimize disease risk.
Pro Tips for Vertical Garden Fence
- Transforming your outdoor space into a lush, green privacy screen doesn't have to be tricky—here are the secrets that make all the difference.
- Precision Matters in Step 1: When attaching your panels in Step 1, take an extra minute to double-check that each panel is perfectly plumb using a level.
- Growing Medium Selection: The lightweight growing medium mentioned in Step 2 is non-negotiable.
Frequently asked questions
Got questions about transforming your space with a vertical garden fence? You’re not alone! Here are some of the most common queries—and their easy answers—to help you get started with confidence.
What’s the best time of year to install a vertical garden fence?
For most plants, spring or early fall is ideal—when temperatures are mild, and roots have time to establish before extreme heat or frost. If you’re using hardy perennials or succulents, you can install year-round in warmer climates. Just avoid planting during peak summer in hot zones to prevent stress on new greenery!
How often do I need to water a vertical garden fence?
Frequency depends on your climate, but daily watering for the first 2 weeks is key to root growth. After that, 2–3 times per week (or more in hot/dry areas) keeps things thriving. Pro tip: Use drip irrigation or self-watering systems to save time and ensure even moisture distribution.
Can I build a vertical garden fence without hydroponics?
While hydroponic systems are popular, soil-based vertical gardens work just as well. Use lightweight potting mix in pockets, fabric grow bags, or modular planters. For heavy plants (like ivy or ferns), opt for a sturdier frame with deeper pockets to support roots.
How do I keep pests away from my vertical garden fence?
Prevention is your best defense! Start with organic pest repellents like neem oil or companion planting (e.g., marigolds). Ensure proper airflow by spacing plants correctly, and remove dead leaves regularly to deter insects. If pests strike, isolate affected plants and treat with eco-friendly sprays.
Is a vertical garden fence more expensive than a traditional fence?
Upfront costs can vary, but DIY kits start around $50–$200 for small sections, while pre-built systems or professional installations may run $10–$30 per square foot. However, the long-term savings on privacy screens, landscaping, and even energy bills (thanks to natural shade!) often outweigh the initial investment.
Wrapping up and next steps
A vertical garden fence isn’t just a stylish upgrade—it’s a game-changer for privacy, sustainability, and curb appeal. Whether you’re transforming a small balcony or revamping your backyard, this living privacy screen brings year-round greenery while boosting your property’s value and eco-friendliness. 🌿
Ready to turn your vision into reality? Start by sketching your design, gathering supplies, and diving into the installation—one lush layer at a time! Your green oasis awaits.